Site Documentation
Font Sizes and Formatting
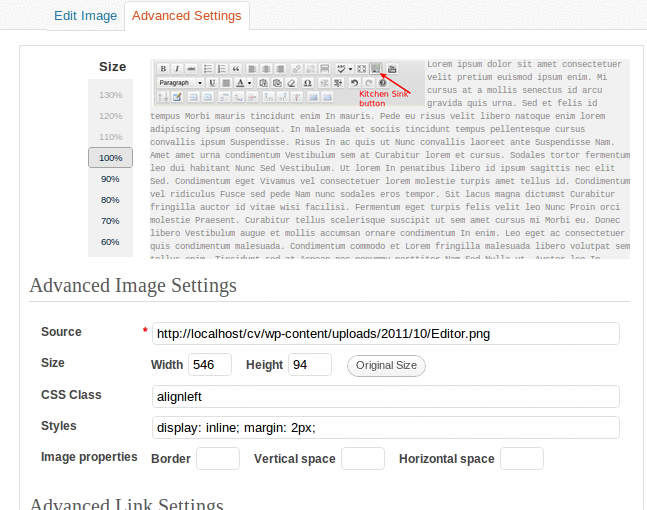
The list below shows the different formatting styles. You can pick the styles from the toolbar above. If the toolbar above doesn’t look like the attached image, click on the “Kichen Sink” button. It will provide you with the additional button bar, which includes the formatting dropdown button.

Notes about the editor
The text editor WordPress provides does not give a true representation of how the text will display on the website. I have made what adjustments I can to show the font sizes, color and styling for the headings, but it will not show the exact look of the website.
Headings:
Here are how the Heading sizes are styled for the website:
Heading 1 (35 pixels, blue color, centered)
Heading 2 (16 pixels, blue color, centered, spacing above and below)
Heading 3 (20 pixels, dark blue, left justified)
Heading 4 (14 pixels, italics, blue, centered)
Heading 5 (14 pixels, blue, bold, line height of 17 pixels)
Heading 6 (14 pixels, black, bold)
Caveats to the above Headings
Some of the Shortcodes and Page and Post templates will adjust some of the above formatting. For example, the three column shortcode will make Heading 3:
Heading 3 orange and 18 pixels
Note about Images
 The default for Images are to be centered, have a 30 pixel space above, and not allow any text on the same line. The editor image above is an example of this. There are some tricks to override the settings, called inline styles. After you upload an image, click on the image. Two icons will appear. The left icon, which looks like a photo will open the properties for the image. If you click on Advanced Settings, you will get the box to the left. In the Styles field, you can add the following to have the text flow around the image:
- display: inline; — This will allow for text and images to be on the same line.
- margin: 2px; — This will put a 2 pixel space around the image. If you need more space, you can increase the number. Adding a -left, -right, -top, or -bottom to the end of margin (before the colon) will affect one side of the image. You can add multiple margin statements.
- float: left; — This will make the image sit on the left side of the text, with the text flowing around it. Changing from left to right will have the image sit on the right side of the text.
Blockquotes
Blockquotes are used to put quick formatting around a block of text, that doesn’t require anything else. This paragraph is in a blockquote, which I have styled for the documentation pages with a yellow background and 500 pixels wide. On other pages, the blockquote will not have a background, but will be centered and 700 pixels wide, which will basically put the text with an additional margin on each side.


